How can I make a solargraph?
A lot of trial and error is usually needed in order to generate good quality solargraphic images. I've listed the information below as to what I know. This should give you a good starting point.
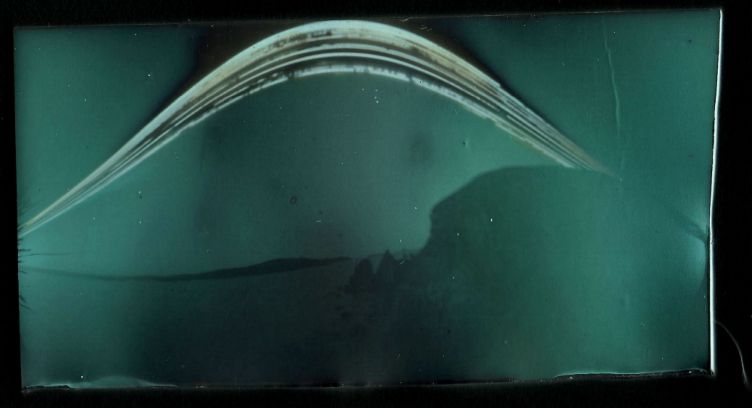
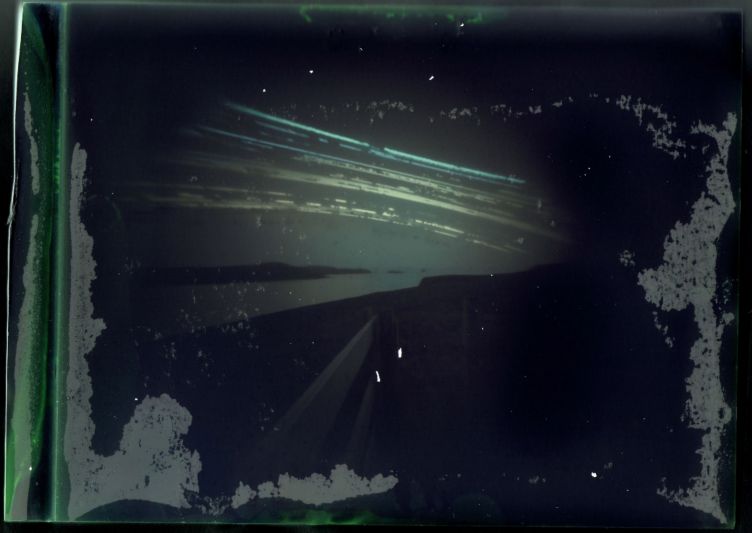
B&W photographic paper is needed with an ASA rating of 5-10 for the long exposures. 1 - 2 months is usually a good starting point for your first image. Remeber a camera will have to withstand any weather, people and animals over that period of time, although the weather itself can make the photograph, even if the photo paper becomes damaged as the example above (right).
Images are scanned into the computer without the need for darkroom chemicals, then is 'processed/developed' in a photographic software package. Something amazing happens here which will boggle your mind, the results are in colour even though it is B&W paper you're using!
Here's what we need to do:
- Get all our equipment ready
- Make the camera
- Place the camera somewhere safe outside
- Wait ? amount of days then retrieve the camera(hopefully still where you left it)
What equipment do I need for solargraphy?
Photographic paper with 5-10 ASA rating
Tins (these are what the actual cameras will be made of)
A sharp knife or other cutting utensil
Thick waterproof tape
Cable Ties (helps fixing the camera)
Matt black spray paint
A needle to make the pinhole
Homemade darkroom (or at least a camera changing bag)
'Optional' safe light for working with photographic paper
Making a solargraphic camera
What type of tin to use
If we use a beer tin then we can get a whole sheet of photographic film inside without trimming, so this can be a good place to start. Although if weather is a definate problem then a tin which is more easily sealed can be better.
Aluminium is better than bare steel as it will not rust.
Peparing the pinhole
Take your tin and open it. Carefully make a pinhole in the centre of the tin with your needle so that light will spread evenly accross the photographic paper. The pinhole must be just the right size. This takes a little experientation. A smaller pinhole will give a sharper image but will allow less light to pass through, a larger pinhole will allow more light thorugh but the image will be less sharp. You need it large enough so that the image has evenly covered the paper but if it's too large then the rain/water may enter the hole also. The method I use is to just push the tip of the needle through but not the full width of the needle. This has produced good results for me without having to be fastidious and measure everything exactly (kinda takes the fun out of things).
Black Paint
Make sure the tin is all clean and dry inside then spray your matt black spray paint on the inside to give a good even covering. We do this so that any stray light does not reflect onto the print.
Second Check
Once the paint is dry then check that the pinhole is clear with the tip of the needle then prepare to add a sheet of photographic paper. Get you lid and black waterproof tape ready. You are going to be in your homemade darkroom in a minute so you'll want to be able to find everything.
Adding the photographic paper
Place the photographic paper inside with the smooth/shinny side of the paper facing outwards, that is to say that the light catching side of the paper is opposite the pinhole. The smooth/shinny side is the side which the solargraph will appear on.
Seal Everything up well
Everything must be sealed up well to avoid water from entering. Water damage is probably the biggest issue for a failed image. Don't forget to cover the pinhole with some temporary take at this point, that your shutter mechanism.
Final Check
Make one final check then thats it. OK you're ready to go.
Setting up your solargraphic camera
P
